
The Bike & The Gear
The only thing you can depend
on is Yourself;
Nevertheless, a tire that lasts
is a good thing
Here I will list and describe my supplies and gear, some of which will, hopefully, accompany me the entire way as I travel down south. My normal list of gear has been refined during all of my earlier tours, with an emphasis on packing light while retaining the capability to cover long distances and, more recently, to cross rugged terrain. However, on an extended tour, especially one that strays far afield like this one will, it is necessary to include a few more items to improve my traveling efficiency. My international tours over the last few year have helped me better understand what additional items will be required this time, so I feel fairly good about my list. Fortunately, my load is lightened by the fact that I never cook for myself while on tour, and can therefore leave the pots, pans, stoves, and so forth behind. Many others would undoubtedly scoff at this heretical practice, but I never felt any desire to carry along all the paraphernalia that would be needed to fix a meal that would surely be less appetizing than what I could obtain on the way each day. The general factors that I look for in my gear are; items that are durable, items that have multiple uses, items that help me maintain a high daily cycling distance, and items that will help prevent getting lost or stranded.
A list of the items that I will carry is shown in the sidebar. Most of these things are fairly standard. Below are more detailed discussions on the bike, and the limited electronics that I will use on this tour.
The Bike
It should go without saying that the most important piece of equipment for any bicycle tour is the bike itself. I certainly agree with that, but only up to a point. Prior to 02002, all of my touring was done using bikes that would generally be seen as "unsuitable" for the task. These were sport touring-type bikes, with reasonable gearing, but few other features that most tourists look for in a bike. Nevertheless, though I had more than my share of mechanical difficulties, especially wheel problems, I completed every tour that I started and enjoyed every one of them. Had I not made those trips because my bike was not up to the task, I certainly would have missed out on some of my fondest experiences.
Of course, when I began doing tours that were farther from home and in more isolated locations, I knew that I needed a serious bike. There are still a few good quality commercial touring bikes available, and also some very nice semi-custom machines from shops dedicated to the touring market. However, I chose to go with a fully customized bike for a few reasons. Since I am a tall rider, I wanted a bike with a "perfect" fit that would be comfortable on very long rides. I also have a few "quirks" in my design preferences that are not usually found on most touring bikes. Finally, and perhaps most importantly, I just thought that it would be a lot of fun to design and assemble the bike myself. Indeed it was fun, but also time-consuming and very expensive. Despite those facts, I ended up with the most pleasurable and capable machine I have ever ridden. I have completed three tours so far on this bike, covering over 10,000 km, including some very rough terrain. Though I have had a few components fail here and there, in general I am very confident that this bike will serve me well as I meander though Gondwana.
There are two main approaches to take when selecting equipment for touring in remote locations throughout the world. One school of thought says use the best quality, most durable parts that you can find and try to avoid failures in the first place. The other says expect things to fail at the most inopportune time, and plan on replacing parts with what can be purchased locally, wherever you may be. Unfortunately, given the rapid changes in componentry over the last 10-20 years, neither of these approached is really ideal any more. The spread in design and function of parts available throughout the world is now very great and one should not expect to always be able to find needed parts in every case. For example, if I had needed to replace any of my drivetrain while in Madagascar, the only replacements available there would have been 5-speed MTB parts. I doubt that I would have been willing to give up a modern 9-speed drivetrain with a wide range for the whole tour just on the off chance that I would need a new cassette. Additionally, if one were to use only 5-speed parts for compatibility in Africa or Latin America, and then need to make a repair while in Australia or North America, it may be difficult to find those parts as well.
There is, unfortunately, no adequate solution to this situation, in my opinion. In my case, I prefer to cover rather long daily distances, so there are certain modern components that I would not choose to do without. In that regard, I designed this bike primarily to meet my comfort and performance requirements, with parts compatibility a secondary concern. Of course, just to be safe, I have a modest cache of spare parts to be left at home, ready to be shipped to me if needed. Let's hope they stay in the closet.
The table below list the specifications of the bike and its components. A few brief comments on some of the more unusual features follow.
Frame: |
Cycles LaMoure Custom, True Temper OX-Gold Tubing, Henry James dropouts & shell |
Wheels: |
Built by Peter J. White |
| Rims | Sun Rims Ryhno Lite 700c, 48 Hole (I got some of the last ones!) |
| Spokes | DT Alpine III |
| Hubs | Front; Phil Wood fsa Rear; Phil Wood fsa, 145 mm axle |
| Skewers | Salsa Quick release |
| Tires & Tubes | Schwalbe Marathon XR 700 x 47(45) and Schwalbe tubes |
Components: |
|
| Headset | Chris King, 1" threaded |
| Handlebars | TTT Prima 199, 46-cm |
| Bar Covering | Home-made stiched leather, made from a modified Wheeklskins cover |
| Stem | Custom Chro-Moly, By Mitch Lamoure |
| Shifters/levers | Campagnolo Ergo Chorus (10 spd) |
| Brakes | Dia Compe "Big Dog" long-reach calipers (discontinued) :-( w/ Shimano road pads |
| Front Derailer | Sachs Quartz |
| Rear Derailer | Shimano XTR mega-9, Long cage |
| Cassette | Shimano XT/11-34, 9 speed |
| Chain | Wippermann Connex 908 Nickel, 9-Speed |
| Bottom Bracket | Phil Wood, 113 mm |
| Crank Arms | Race Face Turbine LP, 180 mm |
| Chainrings | Salsa 7075 Al, 54/40/28 |
| Pedals | Crank Brothers Egg Beaters-Candy SL |
| Seatpost | Thompson Road Elite |
| Saddle | Brooks Swift, brown |
| Computer | Cateye AT-100 |
| Rear Rack | Jandd Extreme |
Odds & Ends |
|
| "Big Cage", 1.5 liter water bottle cage | |
| Third Eye Chain Watcher |
Comments
There are a few differences between my bike and a common stock touring bike. Here are some of the more interesting ones.
~ 48-spoke 700c wheels with 700 x 47 tires. I am a firm believer that wheels are the most important part of a touring bike, and should be given the greatest care in their design and building. Overkill is a good thing in this regard. These are not especially unusual wheels, but similar sets are not often found on stock bikes, other than tandems. There is one other similarity to a tandem wheel set as well, the 145-mm rear axle spacing. I chose this because with the Phil Wood hub, the rear wheel is dishless, and hopefully a bit stronger as a result. Additionally, though I can build and repair wheels, I am far from an expert. I know that if I need to repair this wheel in the field, the dishless design will make it much easier for me to get rolling again. I chose 48 spokes simply for added strength and ease in keeping the wheel true, weight was not a concern at all for me. In fact this wheel set already has over 15,000 km of travel, and I have not needed to true them once (also a testament to the wheel building skills of Peter White.) Some may wonder about the ability to find a replacement rim, if needed. One nice aspect of 48 hole rims is that a 36-hole replacement can be used in a pinch, by simply skipping every fourth hole on the hub flange. The ability to fit 700 x 47 tires was one of my main goals when designing the bike, and my deciding factor for choosing to use a custom frame. I wanted a bike that would travel well over rough gravel and dirt roads. I have been quite pleased by it's capabilities in that regard so far.~ The large gear range. This flies in the face of conventional touring bike wisdom, but the 54/40/28 with 11-34 is the perfect gear set for me. And, yes, I do use the 54-11 combination while on tour!
~ Campy Ergo 10-speed levers I generally like integrated brake/shifter levers relative to bar-ends (though those are nice too,) and I prefer Campy Ergos over Shimano due to their cable routing, and other factors. I know what your saying, "but with a Shimano cassette and derailer?" Actually, yes, thanks to a hack discovered by Brian Jenks at HubBub Cycles, these feuding components do work very well together.
~ Big Dog Brakes. These heavy-duty, long-reach caliper brakes were produced several years ago by Dia Compe, mainly for BMX bikes, though they were also used on some recumbents and other specialty bikes. Sadly, they are no longer made. I was very lucky to find some, because, in my opinion, they are the best brakes ever made for a touring bike.
~ Brooks Swift Saddle. What can I say, I've always been a narrow saddle kind of guy. And I really do love this saddle.
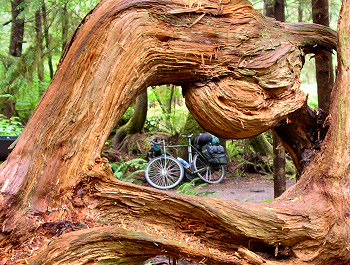
The Bike on an earlier tour
The Gizmos
I believe in packing light for a tour, to the greatest extent possible, and also not carrying anything along that will make more work for me as I travel. There is enough to do just by riding and feeding myself to have to worry about protecting fragile luxuries. In that regard, I have always tried to minimize the amount of electronic devices that I bring along. For most of my early tours, the only such item I carried was a basic camera. However, once I made the switch to digital photography back in 01997, I have gradually become more interested in taking larger numbers of photographs, and obtaining better quality images. Since this Tour is obviously a once-in-a-lifetime experience, I certainly plan to continue that practice this time as well.
However, the length and frequent isolation of this trip poses some interesting challenges for managing images along the way. Fortunately, this is one situation that has actually gotten easier to deal with in the past year or two. In fact, the only good thing about the numerous delays that I encountered since I first decided to do a tour like this, five years ago, is that technology has continually advanced, providing many more practical options for handling large quantities of images. I spent many hours examining numerous possibilities over the years, so perhaps I can pass on some insights to readers who may be considering similar questions. Of course, if you are reading this anytime after, say, January of 02005, this analysis will almost certainly be out of date!
In my case, there will be an opportunity at each ocean crossing to perform a permanent archiving of all the images, so I only need to manage the images for each stage as the tour progresses. There are a few criteria that I wanted to meet:
~ Keep weight and bulk to an absolute minimum;
~ Ensure that I will never run out of power or image storage space;
~ Absolute reliability of the image storage medium;
~ The ability to check images for quality on the way, is nice but not absolutely necessary, and, most importantly;
~ Create and carry duplicate, backup copies of all images.
The number of photographs I take each day usually averages about 30, and with the numerous spectacular sights along the route, I certainly will match or exceed that on this tour. With my camera, jpg images at a medium compression level occupy about 1.5 MB of storage space. For the longest stage, at 210 days, that comes to 6,300 images and over 9 GB of storage. We are not kidding around here, this is some serious data handling, which must be done in places like Tibet and Patagonia, no less. Below are the currently available options, at least the ones that I could find, and my views on each.
~ Carry a Laptop, periodically copy all images to its hard drive.Pros: Easy transfers and manipulations, plenty of storage space. Nice to have available for other uses.
Cons: Expensive; outrageously heavy and bulky; high power requirements; hard drives vulnerable to crashes, especially above 3000 meters; generally fragile, let's face it, there is no way I could keep one functioning for two years on the road. ~ Carry a Micro-PC/Notebook PC, periodically copy all images to its hard drive.
Pros: Smaller, lighter, and less power required than a laptop; Nice to have available for other uses.
Cons: Also expensive; relatively new to the marketplace; hard drives vulnerable to crashes, especially above 3000 meters; generally fragile, no easy way to make backup copies. ~ Carry a Portable hard drive/image bank, periodically copy all images directly from flash cards.
Pros: Small, light and affordable, rapid copying of images, some have image viewing options.
Cons: Fairly high power consumption; hard drives vulnerable to crashes, especially above 3000 meters; somewhat fragile, no easy way to make backup copies. ~ Carry a Portable CD or DVD burner, periodically burn CDs/DVDs directly from flash cards.
Pros: Optical media is very durable, blanks are inexpensive and readily available in many areas, can be used at high altitude.
Cons: Fairly bulky and heavy, 9 GB and backup copies requires 26 blank CDs or 4 DVDs, must find a computer to view images. ~ Burn CDs from flash cards at locations along the way
Pros: Nothing to carry, nothing to buy up front.
Cons: Locating a photo/computer/Net store that can do this in Chaing Mai, or La Paz is a chore that I really don't need to deal with, 9 GB and backup copies requires 26 blank CDs. ~ Carry a PDA with two Flash Card Slots, periodically copy images to high-capacity Flash cards
Pros: Fairly light weight, low power device, flash media is very reliable, easy to make backup copies, can be used at high altitude, can view/manipulate images in real time, can be used for other things;
Cons: Fairly fragile, Large flash cards are very expensive, though prices are dropping fast.
A few years ago, I would have jumped at either the micro-PC or the portable CD/DVD burner options. However, today I have settled on the last choice, the PDA/Flash card method. I will carry an HP hx4700 PocketPC, which includes 1 SD slot and 1 CF slot. I will then occasionally copy all recent images to both a primary and a backup set of 4 GB CF cards. This is very nice because the small size of the cards will allow me to store the two sets in different locations in my bags, so if one bag gets lost or stolen, I may still have the other copy. Additionally, the PDA is nice as it will allow me to rename the each day's images in the evening, so I won't forget what the pictures represent. That is a huge timesaver relative to doing so at the end of the stage. This is not an inexpensive system by any means, but I think it is the best in terms of ease of use, reliability, and size/weight, and these are probably more important to me than cost for this type of tour. I tried out this approach on my 02004 Canada tour, and found it to work very well.
Since I will have the PDA with me, there are then some other things that I can use it for which are rather nice. I have a nifty Excel spreadsheet to keep track of my daily log, expenses, and other information. At the end of each Stage, I can then convert the whole mess with a Word macro into an html text block of the daily log ready to be pasted into this site (cool!) I have also digitized all of my maps into a series of jpg files which can be browsed from an image map on a local web page. I tried this out on the way to Canada as well, and though the screen is a little small, and sometimes hard to see in bright sunlight, it was kind of nice not to have to try and fold up a paper map in a 25-km/h wind. Additionally, I have prepared a series of "guidebook-style" html documents, with information on lodging, food, and sights, gleaned from various travel and tourism Web sites, tailored to the specific areas along my planned route. This will be nice to have, especially since I won't have to lug along a lot of extraneous information for places that I know I won't visit. A set of talking phreasebooks in Spanish, French and Chinese should also come in handy. Finally, I can bring along a nice collection of e-books for those dull days waiting out a rainstorm in the tent (music and video are also possible, but I usually try to get away from all of that stuff on tour, so I will probably just stick with plain old text.)
When deciding on a new items to pack along, I find it useful to compare their weight, size, and cost to what they will be replacing. In this case I have the following load, which weighs perhaps 2kg, and fills most of my handlebar bag and one small pocket of a rear pannier:
~ 1 Camera
~ 1 PDA
~ Several flash cards
~ Batteries, spares & chargers
~ 3 watertight storage cases
These items replace the following old-fashioned analog versions:
~ 1 Camera
~ Notebook
~ 50-75 folding maps
~ 670 rolls of 36-exp film
~ 750 books
~ Deck of cards, checkers, etc.
I don't know what the weight of all that would be, but I feel pretty sure that I will be coming out ahead. As for cost, to purchase and develop the equivalent amount of film alone would run somewhere around $US5,400.00. So, even though I have chosen to carry some of the more costly alternatives, I am still far ahead in that regard. Now, if I can only keep it all dry…
Main Index | Pre-Tour Index
Post-Tour Index | Articles Index
Slideshows
Main Page Methods Routes Hardware Oceans Past Tours |
Packing List
Items in Italics are things that I would not usually carry on a shorter tour.
Tools & Parts
~ Topeak multi-tool
~ Park spoke wrench
~ Park chain tool
~ NBT cassette cracker
~ Extra allen wrenches
~ Phil W. bottom bracket tool
~ 10-cm Vise Grip locking wrench
~ Spare Hub bearing cartridges
~ Spare Hub pawls & springs
~ Spare Bottom bracket bearing cartridges
~ Spare Pedal bearing cartridges
~ Small pocket knife
~ Standard patch kit (XL)
~ Several gluless patches
~ Park tire boots
~ Tire levers
~ Spare tire (beaded)
~ Spare tire (folding)
~ 3 spare tubes
~ 1 set of brake & der. cables
~ 1 set of brake pads
~ Several extra chain links
~ 5 spare spokes
~ 1 Kevlar spoke
~ Spare set of shoe cleats
~ Small bottle of oil
~ Small tube of grease
~ Small container of Proofhide
~ Small rolls of duct & electrical tape
~ Several nylon zip-ties
~ A few 30-cm velcro straps
~ 12 60 x 0.4-cm sections of cotton rope
~ Zefal-hx frame pump
~ Presta-Schrader valve adapter
~ Extra pump gasket
~ Small bag of nuts and bolts
~ Spare cyclocomputer battery
~ 5-mm x 1.5-m combination cable lock
Panniers & Bags
~ Arkel GT-54 rear panniers (slightly modified)
~ BikePro Sierra H-bar bag
~ Pouch for money, passport, bank cards, etc.
~ Small leather pouch for loose change
~ Several 40 x 45-cm heavy-duty zip-seal poly-ethylene bags
Camping Gear
~ Cascade Designs Zoid 1.5 tent
~ Sierra Designs Wild Bill sleeping bag
~ Big Agnes REM air pad
~ Small camping pillow
~ Small white-LED flashlight
~ Small metal spoon
~ Camper's can opener
~ 1-L collapsible Nalgene bottle
~ Aqua Mira water purification mix
Clothing & Personal
~ Bell x-ray helmet
~ Sidi Dominator Mega shoes
~ Pearlizumi Whiteline gloves
~ Sunglasses w/ Chums
~ 4 pairs 90% cotton/lycra cycling shorts. Custom made by Penny Schwyn of Specialty Outdoors
~ 5 cotton t-shirts
~ 1 long-sleeve cotton shirt
~ 1 nylon windbreaker
~ 1 pair cotton/lycra leg warmers
~ 4 pairs Smartwool socks
~ 1 pair glove liners
~ 1 pair lightweight gym shorts
~ 1 baseball cap
~ 1 pair Minnetonka double-sole mocassins
~ 1 swimsuit
~ Burley Rockpoint rain jacket, pants & shoe covers
~ 1 pair convertable travel pants
~ 1 light "dressy" cotton
t-shirt
~ Sterile pads & bandages
~ Traveler's toothbrush
~ Small mirror
~ Fingernail clippers
~ Single-blade razor
~ Foam earplugs
~ Small bottle of shampoo
~ Tube of Lanacane ointment
~ A few acetaminophen tablets
~ Anti-malaria prophylaxis
~ Small bottle of sunscreen
~ Tube of lip-balm
~ Comb
~ Needle & thread
~ Twin-tip Sharpie marker
Electronics & Accs.
~ Pentax 750z digital camera
~ 4 camera batteries
~ Camera battery charger
~ Mini camera tripod
~ HP iPaq hx4700 PDA, w/ extended battery
~ Spare PDA battery
~ PDA battery charger
~ 4 x 4GB Compact Flash cards
~ 3 x 1GB Secure Digital cards
~ A few smaller Flash cards
~ 1 Secure Digital portable USB adapter
~ 3 OtterBox cases for camera, PDA & acc.
~ Universal plug adapter